노션에 정리한 내용을 복사 붙여넣기 했기 때문에 내용이 깨질 수 있습니다
https://github.com/CodePotStudio/React-Challenge/blob/main/2_2_week/jeho_middleware.md
CodePotStudio/React-Challenge
[Code Pot,] React 챌린지 레포지터리. Contribute to CodePotStudio/React-Challenge development by creating an account on GitHub.
github.com
미들웨어의 커링, 중첩 함수 구조가 잘 이해되지 않아서 미들웨어가 만들어지는 과정을 알아보려고 한다
import React, {useCallback} from 'react';
import Counter from "../components/Counter";
import {useSelector, useStore} from "react-redux";
import {decrease, increase} from "../modules/counter";

const CounterContainer = () => {
    const number = useSelector(state=>state.counter);
    const store = useStore();

    return (
        <div>
            <Counter number={number}
                     increase={()=>store.dispatch(increase())}
                     decrease={()=>store.dispatch(decrease())}/>
        </div>
    );
};

export default CounterContainer;
store 내부에 있는 dispatch를 직접 건드려야하기 때문에 useStore를 이용해서 Counter App을 구현했다
디스패치가 발생할 때 마다 액션값, 이전,이후 값을 로깅하는 미들웨어를 구현해보려고 한다
1. 직접 로깅하기
말 그대로 디스패치가 일어나기 전과 후에 하드코딩해서 로그를 출력시키는 방법이다
const CounterContainer = () => {
    const number = useSelector(state=>state.counter);
    const store = useStore();

    return (
        <div>
            <Counter number={number}
                     increase={()=>{
                         const action = increase();
                         console.log(store.getState());
                         console.log(action)
                         store.dispatch(action);
                         console.log(store.getState());
                     }}
                     decrease={()=>{
                         const action = decrease();
                         console.log(store.getState());
                         console.log(action)
                         store.dispatch(action);
                         console.log(store.getState());
                     }}/>
        </div>
    );
};

export default CounterContainer;
결과

원하던 결과를 얻긴 했지만 매번 이렇게 하드코딩을 할 순 없을 것 같다
2. 디스패치를 감싸기
말 그대로 디스패치를 다른 함수에 넣어두고 그 함수 내부에 로그를 출력하게 코드를 추가해주는 방법이다
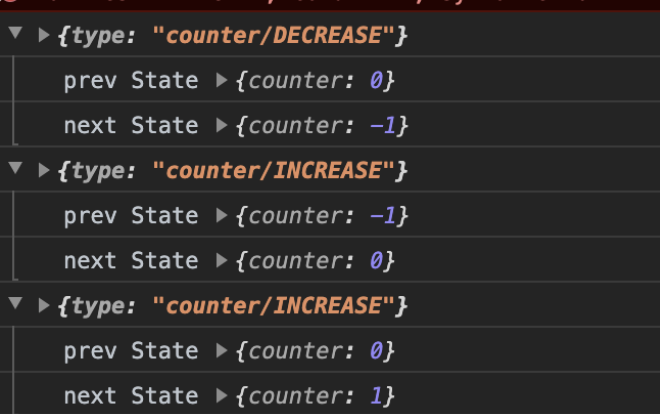
이번엔 로그들을 액션 이름으로 그룹화 해서 좀 더 보기 좋게 만들어봤다
const CounterContainer = () => {
    const number = useSelector(state=>state.counter);
    const store = useStore();

    function dispatchAndLog(store,action){
        console.group(action);
        console.log('prev State',store.getState());
        store.dispatch(action);
        console.log('next State',store.getState());
        console.groupEnd();
    }

    return (
        <div>
            <Counter number={number}
                     increase={()=>dispatchAndLog(store,increase())}
                     decrease={()=>dispatchAndLog(store,decrease())}/>
        </div>
    );
};

export default CounterContainer;
이제 dispatchingAndLog 함수를 dispatch처럼 사용할 수 있다
결과
가독성도 좋아졌고 하드코딩 또한 줄었지만 특별한 함수를 생성해야하는 것과 대체된 함수를 불러오는 것은 별로 좋지 못한 것 같다
3. 디스패치 몽키패칭하기
- 몽키패치
dispatch 메서드를 수정하는 일이라면 별로 어렵지 않을 것 같다
원래 메서드에 위에서 만들어 놓은 dispatchAndLog 함수로 바꿔치기하면 끝인 일이니까
    const store = useStore();

    store.dispatch = function dispatchAndLog(action){
        console.group(action);
        console.log('prev State',store.getState());
        store.dispatch(action);
        console.log('next State',store.getState());
        console.groupEnd();
    }
이렇게 작성하고 코드를 돌렸는데 너무 멍청했다
dispatch가 호출되면 계속해서 dispatch를 호출하는 무한 재귀에 빠지는 게 된 것
const next = store.dispatch;

store.dispatch = function dispatchAndLog(action){
    console.group(action);
    console.log('prev State',store.getState());
    next(action);
    console.log('next State',store.getState());
    console.groupEnd();
}
그래서 dispatchAndLog 외부에 기존 dispatch를 next에 저장해둔 뒤 dispatchAndLog에 저장해둔 next를 통해 dispatch를 실행시키도록 했다
실패

잘 실행되는 줄 알았더니 dispatch가 실행할 때 마다 로그 안에 로그가 중복되어서 출력되고 있었는데
const CounterContainer = () => {
    const number = useSelector(state=>state.counter);
    const store = useStore();
    const next = store.dispatch;

    store.dispatch = function dispatchAndLog(action){
        console.group(action);
        console.log('prev State',store.getState());
        next(action);
        console.log('next State',store.getState());
        console.groupEnd();
    }

    return (
        <div>
            <Counter number={number}
                     increase={()=>store.dispatch(increase())}
                     decrease={()=>store.dispatch(decrease())}/>
        </div>
    );
};
내가 짠 코드의 흐름을 보면 다음과 같다
- next 에 store.dispatch(원본)가 저장된다
- store.dispatch는 dispatchAndLog로 대체된다 (원본 소멸)
- dispatch가 발생해서 리렌더링된다
- next에 store.dispatch(원본이 아닌 dispatchAndLog)가 다시 저장된다
해결
이걸 해결하려고 많은 삽질을 했다 (useEffect를 써서 첫 렌더링에만 next에 원본 담기, 리덕스 라이브러리들어가보기 등등)
애초에 처음부터 store를 몽키패칭하는 위치가 잘못되있었다는 걸 겨우 깨달았다
store는 최상위 컴포넌트에서 createStore로 만든 뒤 useStore를 통해서 불러오는 각 컴포넌트에서 사용할 수 있게끔 하는 것이니까 최상위에서 store를 만드는 시점에 메서드를 수정하면 되는 것이었다
// in index.js
import React from 'react';
import ReactDOM from 'react-dom';
import App from './App';
import {createStore} from "redux";
import rootReducer from "./modules";
import {Provider} from "react-redux";

const store = createStore(rootReducer);
const next = store.dispatch;

store.dispatch = function dispatchAndLog(action){
    console.group(action);
    console.log('prev State',store.getState());
    next(action);
    console.log('next State',store.getState());
    console.groupEnd();
}

ReactDOM.render(
    <Provider store={store}>
        <App />
    </Provider>,
  document.getElementById('root')
);
이렇게 컴포넌트 바깥에서 함수를 수정해주면 렌더링에 영향을 받지 않고 원하는 대로 작동한다

문제점
여전히 문제점은 남아있는데
const store = createStore(rootReducer);
const next = store.dispatch;

function patchStoreToAddLogger(store){

    store.dispatch = function dispatchAndLog(action){
        console.group(action);
        console.log('prev State',store.getState());
        next(action);
        console.log('next State',store.getState());
        console.groupEnd();
    }
}
// 디스패치가 발생하면 그냥 로그를 찍는 더미 함수
function patchStoreToAddCall(store){

    store.dispatch = function dispatchAndCall(action){
        console.group(action)
        console.log('변화합니다');
        next(action);
        console.groupEnd();
    }
}
이 처럼 두 개 이상의 미들웨어를 적용하고 싶으면 어떻게 해야할까?
함수로 만든 둘을 따로 분리해서 patchStoreToAddCall(store); , patchStoreToAddLogger(store);
와 같이 사용한다면 하나씩 사용할 수는 있겠지만
store의 dispatch는 한 개다 이걸 로그용으로 대체한 상태로 다른 기능을 동시에 사용하기는 힘들어 보인다
4. 몽키패칭 숨기기
여태까진 dispatch를 바꿔치기 했지만 새로운 disaptch를 반환한다면 어떨까?
function logger(store){
    const next = store.dispatch;

    return function dispatchAndLog(action){
        console.group(action);
        console.log('prev State',store.getState());
        const result = next(action);
        console.log('next State',store.getState());
        console.groupEnd();
        return result;
    }
}
function call(store){
    const next = store.dispatch;
    store.dispatch = function dispatchAndCall(action){
        console.group(action)
        console.log('변화합니다');
        const result = next(action);
        console.groupEnd();
        return result;
    }
}
구현하다 알게된 사실인데 store 내부에 구현되어있는 dispatch는 리턴값이 액션으로 되어있다 그래서 내가 구현한 call과 log도 액션값을 리턴하도록 따라해주었다
다수의 미들웨어를 몽키패칭하게 도와주는 함수를 작성해보자
function applyMiddlewareByMonkeypatching(store, middlewares) {
    middlewares = middlewares.slice();
    middlewares.reverse();

    middlewares.forEach(middleware => (store.dispatch = middleware(store));
}
// 적용시
applyMiddlewareByMonkeypatching(store,[logger,call]);
store와 작성한 미들웨어들을 파라미터로 받고 실제 실행 때는 자기순서를 지킬 수 있도록 역순으로 바꾼 다음
store.dispatch에 미들웨어 함수의 리턴값를 넣어준다
middlewares.forEach(middleware => (store.dispatch = middleware(store));
이게 무슨 의미지? 싶었다 결국 마지막 함수의 값으로 store.dispatch가 덮어씌워지는 거 아닌가?
applyMiddlewareByMonkeypatching
이 함수가 실행되는 중의 middlewares의 배열 상태는 [call,logger]이고 forEach가 돌아가면서 store에 실제로 어떻게 저장되는지 확인해보자
이 흐름을 살펴보는 중에 왜 미들웨어 함수 내부에 next를 저장해야하는지도 깨닫게 되었다
- 첫 번째로 call(store)의 리턴 값이 store.dispatch에 저장되야하는데 그 내부를 살펴보면 다음과 같다
store.dispatch = function call(store){ // 여기서 call함수의 next에 원본 store.dispatch가 저장된다 const next = store.dispatch; // 이 return에 의해 dispatchAndCall가 store.dispatch에 저장된다 return function dispatchAndCall(action){ console.group(action) console.log('변화합니다'); // 여기의 next는 원본 store.dispatch다 const result = next(action); console.groupEnd(); return result; }; }();- 두 번째로 logger(store)의 리턴값도 store.dispatch에 저장되며 내부 또한 비슷하다
 //현재 dispatch에는 call에 의해 dispatchAndCall가 저장되어있다
 store.dispatch = function logger(store){
         // 그러므로 logger가 가진 next에는 dispatchAndCall가 저장된다
     const next = store.dispatch;

         //이 return에 의해 dispatchAndLog가 store.dispatch에 저장된다
     return function dispatchAndLog(action){
         console.group(action);
         console.log('prev State',store.getState());
                 // 여기의 next는 dispatchAndCall이다
         const result = next(action);
         console.log('next State',store.getState());
         console.groupEnd();
         return result;
     };
 }();
결과

미들웨어 체이닝에 의해서 할당해준 dispatch들이 모두 실행되는 것을 볼 수 있다
5. 몽키패칭 제거하기
거의 다 온 것 같다
체이닝을 조금 바꿀껀데 미들웨어 안에 변수로 현재의 dispatch를 저장하는 것이 아닌 외부에서 store.dispatch를 넘겨 줄 것이다
function logger(store){
        // const next = store.dispatch 대신
    return function wrapDispatchAndLog(next){
        return function dispatchAndLog(action){
            console.group(action);
            console.log('prev State',store.getState());
            const result = next(action);
            console.log('next State',store.getState());
            console.groupEnd();
            return result;
        };
    }
}
function call(store){
        // 마찬가지
    return function wrapDispatchAndCall(next){
        return function dispatchAndCall(action){
            console.group(action)
            console.log('변화합니다');
            const result = next(action);
            console.groupEnd();
            return result;
        };
    }
}
이제 몽키 패치가 아니게 되었으니 applyMiddlewareByMonkeypatching이름도 applyMiddleware로 바꾸어 주자
function applyMiddleware(store, middlewares) {
    middlewares = middlewares.slice();
    middlewares.reverse();

    middlewares.forEach(middleware=>store.dispatch = middleware(store)(store.dispatch));
}
내부 변수인 const next = store.dispatch로 저장해서 체이닝을 유지하는 것이 아니라
함수로 한 번 더 감싼뒤 매개변수로 store.dispatch자체를 넘겨줌으로써 체이닝을 유지한체 next로 사용할 수 있게되었다
arrow function으로 바꿔본 미들웨어들
const logger = store=>next=>action=>{
    console.group(action);
    console.log('prev:',store.getState());
    const result = next(action);
    console.log('next:',store.getState());
    console.groupEnd();
    return result;
}
const call = store=>next=>action=>{
    console.group(action);
    console.log('변화합니다');
    const result = next(action);
    console.groupEnd();
    return result;
}
이제 드디어 미들웨어의 구조를 이해할 수 있게 되었다..
'React' 카테고리의 다른 글
| Styled-components (0) | 2021.02.26 |
|---|---|
| Redux-saga (0) | 2021.02.25 |
| Redux 파일 구조 (0) | 2021.02.15 |
| 프레젠테이셔널, 컨테이너 컴포넌트 패턴 (0) | 2021.02.13 |
| 불변성 (0) | 2021.02.02 |
